Android Scrollable Tabs – iOS Version.

Hello again,


I would like to share with you a control that I’ve build before and I think you maybe make a use of it.

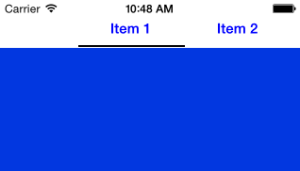
It’s just like the Scrollable Tabs in android devices, you can add as much as pages with a title for each page in the top


Screen Shot 2014-04-21 at 10.48.10 AM

This is an image of the control, I’ve made a use of the MKHorizMenu, thanks to the creator. I’ve made some customization too, like changing the color of the titles, the line color too.


Click here to go to the project source code in GitHub.


Hope this control help you.

If you like this post, please share it 🙂


Stay toned for my next post.

Learning Unity for beginner, Part 2.

Hello again,

As mentioned in the previous post, This post will be about all the problems I’ve encountered and how I resolved them, So, Let’s start:

  1. Glow effect: I was searching on how to apply a glow effect on a scene, there is no direct way to do it, until I found a project from Unity (demo project)  that implementing the effect using a simple c# code and shader, please find the files on this link. Unzip the file and copy them to your project, go to your camera and in the Inspector, click on ‘Add Component’ and search for glow script. This is it, you have now the glow effect on your camera, also you will find some proprieties in the Inspector under the Glow Effect, like Glow Intensity, Blur Iterations, … try to adjust these variable to see how it affect your scene.
  2. Mirrors: This one was a bad ass for me, I’ve tried many solutions, but without any luck to get it work. Please download this file, unzip it and import it to your project. You will find 2 folders (Materials & Scripts). Inside Materials, you will find a file named “Ground Reflection.mat” it’s an object that you can add to the scene, that’s it, drag the Ground Reflection and adjust its position, rotation and scale as you wish, now, you have a mirror reflection :).
  3. Movie Texture Sound: You can add your movie and display it in your scene (like a TV screen), you add it and everything going well, except the sound, the sound will play on the scene and you will hear the sound wherever you go, but I want to attenuate the volume when I get away from the sound source (in my example, the TV), I did a lot of research and tried many things, without luck. To make it happen, you need to extract your movie sound and add it alone to your project. then, add Audio Source to your project, attach your audio file to it, make sure your audio file is marked as 3D sound, set the Doppler Level to 0, and Volume Rolloff to Linear Rolloff, set the min distance and max distance to the values you need and that’s it. your sound file will be eliminated when you are away from it (more that the max distance you set). The key here is to extract the sound from the movie and play each one alone, without this, the audio will be played over all the scene regardless your min/max distance value.

I hope you find these helpful for you. Take care.

Learning Unity for beginner

Hello,

A couple of weeks ago, I’ve started working and learning Unity (a 3D game engine) and I thought I should share my experience with you guys, I’m still learning and there is a lot of topics that I should read.

However, my experience before starting with Unity was mobile development and 2D games (Cocos2d and AndEngine), so, there was zero experience with 3D and it’s concept. There is a main keywords that everyone gonna learn Unity should know. Here we start with them:

  • Meshes: it’s the actual model with it’s vertex and points that form the model.
  • Textures: it’s the image that will cover your meshes, it’s the same as the textures in 2D gaming development.
  • Materials: It’s the shader that you use to specify the appearances of the object.
  • Shaders: It’s the way that the texture will appear and act in the object, like if you want the texture to be transparent, has a reflection, to be customised.

these are the main items that you should be aware and understand them correctly and to be honest, you will have a better understanding when you deal with them, I’ve beed reading a lot of articles and books regarding these topic, but without dealing with them and working on them, you will never understand them correctly/fully.

Finally, I would like to share with you some of the tutorials site that I’ve found them useful:

  1. The documentation of Unity.
  2. Unity channel on Youtube.com.
  3. Mobile Tuts.

And don’t forget to use Stack Overflow for any problem you face along side with Unity Community.

Be toned for my next post, I will talk about the problems that I’ve faced and how I resolved them.

Hope you enjoyed and found something useful for you.


Extract source code from APK file.

Hello,

This is a tutorial of how to extract an APK source code

Requirments tools:
1. dex2jar.
2. jd-gui.

I will show you how to extract the source code for a game called “Magic Piano”.
First of all, download the apk file from the internet.
after the download finish, you will have a file called “Magic-Piano-v1.0.1.apk”,
rename it to “Magic-Piano-v1.0.1.zip”, we changed the apk to zip, then extract the zip file.

Open the “Magic-Piano-v1.0.1” folder, you will see many folders and files, we need the files named “classes.dex”
Note: all the game assets, graphics and sound are accessible, you can take and use them.

We need this file, this is the file that contain the source code.

Extract the “dex2jar-0.0.9.8.tar.gz”, that will produce a folder called “dex2jar-0.0.9.8”, copy the “classes.dex” to it.
Now, open the Terminal and navigate to “dex2jar-0.0.9.8” folder. then write this command “sh dex2jar.sh classes.dex”

Now, you will get a file named “classes_dex2jar.jar”. 😛

After that, we will use “java decompiler”, the jd-gui tool, double click on jd-gui and click on open file then open “classes_dex2jar.jar” file from that folder, now you get classes files… save all these classs file (click on file then click “save all sources” in jd-gui), by src name, at this stage you get source.

Video that shows how to do this, hope you enjoy and learn something useful for you,
Please if you like it, share it and if you didn’t get anything, just comment and i will answer you.

T.C.

Localize iOS app at runtime.

Hello again,

This tutorial will show you how to localize your app at run-time, please feel free to check an example in github/iOS-Localization.

First of all, download the Language.h/m class from the repository and add them to your project.

  • after that import the Language.h to your class like this:

#import “Language.h”

  • In your appDelegate, set your startup language like this:

[Language setLanguage:@”en”];

  • Create a localize string file that contain all your strings localized depending on the languages you choose.(Please check the example in the repository).
  • To get the string based on the selected language, use the method in the Language class:

[Language get:@”title” alter:@”title not exisit”];

That’s it, for more understanding of how to do this clearly, please check the example in the github.

Thank you and stay tuned for more tutorials soon.

How to call an objective-c method from JavaScript

As the title says, call an objective-c method from Javascript/HTML file. Let’s talk about the Javascript side, we have to request a new URL with a specific string and this is done in Javascript side by

function communicateWithObjectiveC () {

window.location = “js-call:myObjectiveCFunction:” + names;

}

This will make the UIWebView call a delegate method, which is :

– (BOOL)webView:(UIWebView *)webView

shouldStartLoadWithRequest:(NSURLRequest *)request

navigationType:(UIWebViewNavigationType)navigationType {

In this method, we can search the new request string by using:

if ([[[request URL] absoluteString] hasPrefix:@”js-call:”]) {

after that, we call the method that we want by:

[self performSelector:NSSelectorFromString(function)];

If we wrap up the previous codes (Objective-c side), the method will look like this:

– (BOOL)webView:(UIWebView *)webView

shouldStartLoadWithRequest:(NSURLRequest *)request

navigationType:(UIWebViewNavigationType)navigationType {

// Intercept custom location change, URL begins with “js-call:”

if ([[[request URL] absoluteString] hasPrefix:@”js-call:”]) {

NSString *requestString = [[request URL] absoluteString];

// Extract the selector name from the URL

NSArray *components = [requestString componentsSeparatedByString:@”:”];

if ([[components objectAtIndex:1] isEqualToString:@”myObjectiveCFunction”]) {

NSString *function = [components objectAtIndex:1];

// Call the given selector

[self performSelector:NSSelectorFromString(function)];

}

// Cancel the location change

return NO;

}

// Accept this location change

return YES;

}

That’s it, piece of cake 🙂

If there is any ambiguity, don’t be shy, just ask.

Be tuned for the next Tutorial.

Remove the white background for UIWebview

This is a simple tip for removing the white background for UIWebView.

The problem appear when you load a local html file or a request to display a web page, it takes a couple of millisecond until the white background disappear.

We are fine with it as a developer, but some of the customer may get upset to see it, so i’ve searched for a solution and with some of luck i found it, the solution is simple, you just have to add this piece of code in viewDidLoad to remove the white background


[webView setOpeque:NO];
[webView setBackgroundColor:[UIColor clearColor]];


This is it, the problem is solved.

stay tuned for the next topic.

Mumen Shabaro.

Remove/Hide the title bar from the app

Here is my first android topic, this topic about how to remove the title bar from the app.

if you wanna to remove/hide the title bar from your app, you just have to insert the following code in onCreate method.

requestWindowFeature(Window.FEATURE_NO_TITLE);

this line of code must be written before the setContentView method.

OR

you can get this work by adding the following code to the manifest file

android:theme=”@android:style/Theme.NoTitleBar”

Hope this will be useful for you.

stay tuned for the next topic.

Mumen Shabaro.